Photoshop 101:
A short project walkthrough
This project is created in Photoshop at a standard screen
resolution of 800 x 600 (72 DPI). Each element will be created in separate
layers to allow for later separation if necessary. This allows it to be
carried into PowerPoint, Web, or a Multimedia project as custom backgrounds,
navigation, and graphical elements.
This walkthrough is designed as an introduction to visual
design using Photoshop as the primary imaging tool. Instructions work within
Photoshop 5 or higher and for PC or Mac versions.
For this project pull down menus will be used for
direction, be aware Photoshop allows for many ways to perform most
operations.
We will use the following elements of Photoshop.
Tools –
Rectangular Marquee  , Elliptical
Marquee , Elliptical
Marquee , Paint
Bucket , Paint
Bucket , Text Tool , Text Tool . .
Color picker area 
Menus –
File < New, File < Save for Web, Edit < Copy,
Edit < Paste,
Filter < Stylize < Wind, Filter < Render <
Clouds, View < Show rulers,
Layer < Arrange < Send to front, Layer < Style
< Bevel and Emboss
Windows –
Layer: Order, Duplicate, New Activate
Color: Identify RGB values,
Options bar (options window in Photoshop 5.5 and lower):
Fixed size and normal marquee

- Open
Photoshop.
- In
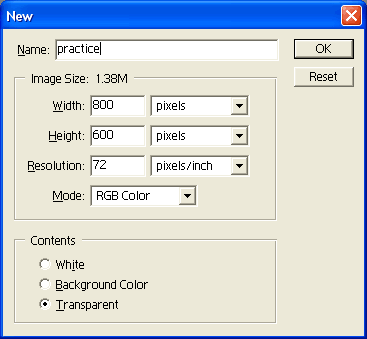
the File pull down menu select New.
- Name
the file (avoid using unusual characters e.g. @#$%J).
- Make
the width 800 by height 600 pixels, DPI 72, RGB color. Click OK.
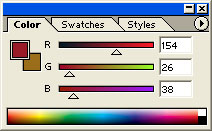
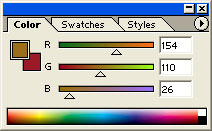
- Choose
two colors from the Color Picker area of the Tools palette (brick red
and dark mustard, above).
- In
the Colors window, identify and record the RGB values of your two
colors. This will allow you to replicate the colors later
brick red – Red 154, Green 26,
and Blue 38
dark mustard – Red 154, Green
110, Blue 26
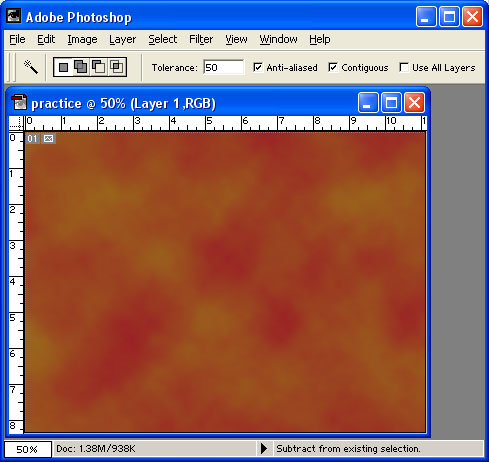
- In
the Filter pull down menu choose Render < Clouds.
 
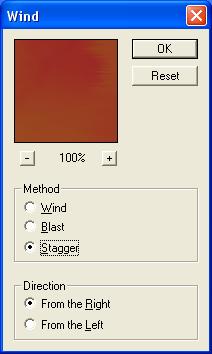
- In
the Filter pull down menu choose Stylize < Wind and select Stagger
from your options. Click OK.
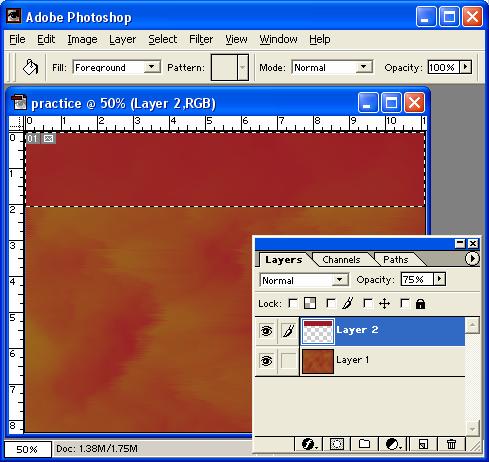
- Create
a new layer using the Layers window (the icon looks like a small sheet
of paper with a bent corner at the bottom of the Layers window), and
make sure that it is active (it will be highlighted in dark blue).

- Select
your Rectangular Marquee tool and in the Options window set the Style
to fixed size 800 (width) by 150 (height).

- Click
on your work area to make the selection. The “marching ants” identify
your selection.
- Use
your arrow keys to move the selection to the very top of the image.

- Use
the Paint Bucket tool to fill your selection with one of your
two chosen colors.
- In
the Layers window change the Opacity to 75 %.
- Create
another new layer using the Layers window, and make sure that it is
active (it will be highlighted in dark blue).

- Select
your Rectangular Marquee tool again and this time set the fixed size to
175 (width) by 600 (height).
- Click
in your work area to make the selection. Move the selection to the far
left of the image.
- In
the Color area of the Tools palette, you should see a curved arrow above
the two chosen colors. Click on this curved arrow to switch the two
chosen colors.
- Again
use your Paint Bucket tool to fill your selection.
- Again,
in the Layers window, change the Opacity to 75 %.

- Create
another new layer using the Layers window, and make sure that it is
active (it will be highlighted in dark blue).
- Select
your Rectangular Marquee tool again and set the fixed size to 175
(width) by 150 (height).
- Click
in your work area to make the selection. Move the selection to the upper
left corner.
- This
time click on the small icon (to the lower left of your two color
choices). This changes your colors to the default color choices, black
and white.
- Use
the curved arrow to switch the active color to white.
- Use
the Paint Bucket tool to fill your selection with white.
- If
the white area is not on top of the others use the Layer pull down menu
by choosing Arrange < Send to front.

- Create
another new layer using the Layers window, and make sure that it is
active (it will be highlighted in dark blue).

- Use
the Elliptical Marquee tool to create a tablet shaped ellipse
selection in the lower left rectangle. Change the Style to Normal,
from Fixed size. This will be a button.

- Use
one of the original two colors for this button. Do this by changing the
RGB of the Colors window to replicate the colors you had in step 6.

- Use
the Layer pull down menu choosing Layer style < Level and emboss.
Then choose Inner bevel for Style and click OK. You can also use the
Effects button
 in the Layers window if you are using
Photoshop 6 or later. in the Layers window if you are using
Photoshop 6 or later.

- Duplicate
the layer with the button in it as many times as you want buttons. Do
this by clicking on the small triangle (facing right) in the
upper-right-hand corner of the Layers window. Select Duplicate layer.
- If
you do not have a set of measurements (rulers) along the top and left
side of your document, use your View pull down menu to select Show
rulers.
- Create
guides by moving the cursor into the ruler’s white area and click and
drag a guide line out. These guides will help place the buttons in a
column.
- Link
all of the buttons in the layer window and then use the Layer < Distribute
Linked < Vertical Centers to evenly distribute the buttons along your
guideline.

- Create
another new layer using the Layers window, and make sure that it is
active (it will be highlighted in dark blue).
- Use
the Elliptical Marquee tool to create a circular shape for the
upper-left white square. Holding the Shift button down when you create a
marquee shape will force a regular shape (square, circle). Make a circle
that almost fills the square area.
- In
the Layers menu select the background layer with the cloud effect in it.

- In
the Edit pull down menu select Copy.
- In
the Edit pull down menu select Paste. This should generate a new layer
with a circular area filled with the background filling it. This might
be used as a logo or home navigation.
- If
the circular area is not on top of the others use the Layer pull down
menu choosing Arrange < Send to front.
- Use
the layer pull down menu choosing layer style < bevel and emboss.
Then select Inner bevel for Style and click OK.
- Add
text (text will automatically generate its own layer) using the Text
tool and guidelines (vertical and horizontal) to line up text with
buttons and logo area. Change the font and size (and add a bevel or
effect) if necessary.

- Use
the File pull down menu and Save for web to check the design online and
in PowerPoint or other software.
|