Frame-based Web Pages
Frames allow multiple HTML documents to exist in a single
window (or frame).
They allow the designer to fix elements on screen that will
not reload or change as the user moves throughout a site. This allows for
navigation, banner, logo, header, and footer elements to stay fixed on screen
while content elements change in a separate frame. Frame-based design has been villainized in part because of browser/screen compatibility
and in part because of its added complexity. Used correctly, frames can be a
real asset because they fix commonly used element on screen. Used poorly, they can destroy a site and trap
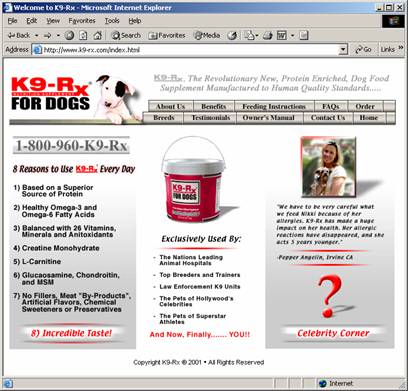
site viewers in a virtual black hole. The site below (K9-Rx) is using frames to
keep the top area (navigation and banner elements) fixed. Several examples of
frame based Web design are provided below as well.
http://projects.dartmouth.edu/the_room/index.html
http://www.math.ilstu.edu/saolear/
http://www.hallas.demon.co.uk/HuddersfieldSingers/frames.html
http://msdn.microsoft.com/library/
http://www.clyde-group.com/Frames/Findex.html
http://www.costaricatours.co.uk/default.htm
http://www.k9-rx.com/index.html
http://www.monitor-computing.pwp.blueyonder.co.uk/bmrg/main.htm
http://www.bmw.com/ (many
links are black holes)
For the designer a Web page authoring tool like Dreamweaver allows for a high degree of creative control over frame-based design. Some understanding of HTML is especially helpful if you intend to create highly customized and elegant framesets. Dreamweaver tends to nest complex framesets reducing site (and code-level) elegance.
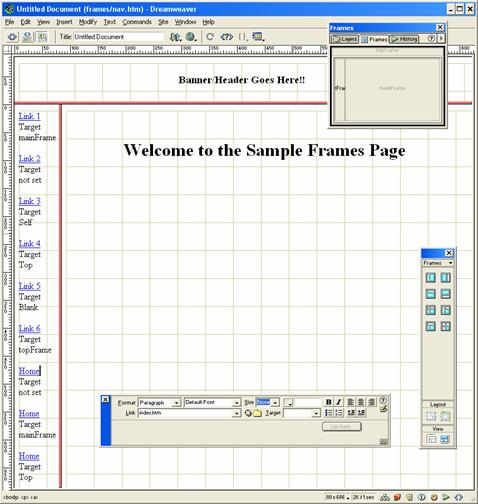
I have chosen a frame-based design here from Dreamweaver’s Object > Frames window (toolbar). The bright blue text and arrow are added here for illustrative purposes to show the Frames toolbar item chosen and identify the frames generated.
Notice the work view ![]()
Here I have chosen to see both the HTML (top) -- indicated
by the < > and WYSIWYG (what you see is what you get,
bottom) – indicated by the ![]() icon.
icon.
You will want to make the frame borders visible (view <
invisibles < frames DW 3 -- view < visual aids < frame borders DW 4).

By default Dreamweaver will name each frame (identified here by the blue text and in the html). Naming each frame allows links to target specific areas on screen.
Open the Frames window. This tool will help you navigate your frames-based pages.

Frames-based pages are composed of two primary structural elements framesets and frames. A frameset contains and structures multiple frames. A frame contains a unique Web page designed to fit within a frameset.
Every frame and the primary frameset needs to be saved. Click into each frame and type some descriptive text. Then use the File menu to Save Frame As to save these frames as unique HTML documents. The example below has three frames made up of the HTML files top.htm, nav.htm, and main.htm. The primary frameset contains and structures all of the frames. To select it click on the outer border on your page (or in the Frames window). Once the frameset is selected use the File menu to Save Frameset As to save your primary frameset (index.htm in this example).
Notice the effect selecting frame (and frameset) edges has on the properties window. Select the edge of a frameset and you can resize individual frames, and change border values (size, color) using the properties window.

Select an individual frame in the Frames window and the frame properties change the frame name, and for resizing and scrolling functions. Frame Row and Column values behave like HTML tables allowing absolute (# of pixels), relative (x, 1x, 3x), and percentage values. This can allow for some complex structural elements to be created.

In the example below Dreamweaver has generated a frameset composed of two rows, the first is 80 pixels and the second is relative represented with an asterisk [*]. The asterisk causes the second row to take up whatever space is left. The second row has a nested frameset in it. A frameset is nested if it is inside another frameset. This nested frameset has two columns one is 80 pixels and the other is relative. This frameset creates spaces for navigation and a main content area. The frameborders are turned on (5 pixels wide and red) in the example below.
One problem many people have in using frames is that they don’t understand targeting. Targeting allows the designer to make links open in any named frame, or in one of several standard styles. The default target is self (opens in same frame), typically frame-based sites use a navigation frame to target a frame named "main" (or something similar), logos, headers and footers are also common uses for framesets. All links to sites outside of your own should Target Top clearing the frameset before opening the new site. Targeting Blank here will open the site in a separate window. This site can be accessed at http://www.communication.ilstu.edu/jrjohns/tutorial/frames/
To edit frames-based pages open up the primary frameset (index.htm here) to get the whole page view. Click in any area make changes and always save as you go.
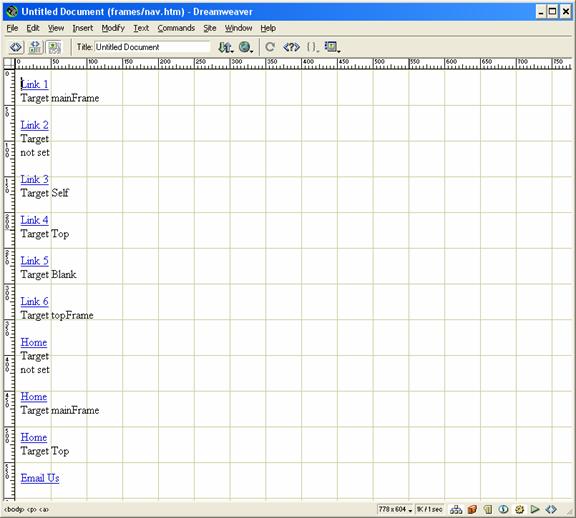
Sometimes it is easier to edit one html page at a time. Just open any single page to edit this way (shown below).
Be especially careful with screen size issues when using framesets. Size issues can cause major scrolling issues (horizontal and vertical). Some browsers and platforms create space for scrollbars (or scrollbars) regardless of whether or not they need them or whether or not the scrolling = no option is selected in Dreamweaver. Build in 15 pixels of extra space on the right and bottom of your designs to accommodate for unexpected shifts. Don’t forget that scrolling can create aesthetic and space issues with the design.